Thermal Sleeve Direct Wear Measurement

Background

Reactor Pressure Vessel Head (RPVH) Thermal Sleeve (TS) flange wear failure is a known ageing phenomenon on PWR plants.

Westinghouse offers a direct visual inspection system capable of accurately assessing Thermal Sleeve and adaptor wear, as well as locating any flange debris in the adaptor housing. The inspection tools are delivered by a tool carrier for an ALARA-optimized inspection.
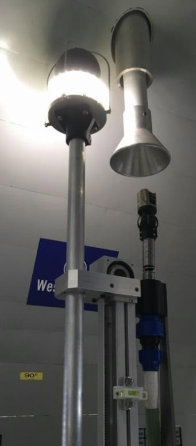
Figure 1 - Giraffa and Serpentes inspection systems

Figure 1 - Giraffa and Serpentes inspection systems

Benefits

  • The main advantages of Westinghouse’s direct Thermal Sleeve Wear Measurement systems are:
    • No human intervention under the RPVH (tool change on the outside of the RPVH stand manway)
    • Low radiation exposure for technicians and low overall exposure dose
    • Accuracy of ± 1mm on wear measurement
    • Delivery of the wear measurements immediately after acquisition
    • Measure of Thermal Sleeve Wear dimensions from the outside
    • Full video recordings of wear marks on the Thermal Sleeve outside
    • Measures of outside wear marks or loose debris
    • Full video recordings of the situation inside the Thermal Sleeve and adaptor housing
    • Measures of wear and marks inside the Thermal Sleeve and adaptor housing
    • Finding of loose debris inside the Thermal Sleeve and adaptor housing

Experience

WesDyne, the Westinghouse NDE company, developed the direct Thermal Sleeve Wear Measurements system in 2018. The inspection systems have successfully been used at a customer site in Europe, ensuring reliable wear measurements for safe plant operations.

Technology Description

The Westinghouse direct inspection system is used to get the full status of the Thermal Sleeve and RPVH adaptor wear. The inspection system consists of two different tooling systems:

  • Outside TS measurement – Giraffa system
  • Inside TS and adaptor assessment – Serpentes system

Outside Inspection

The Outside Giraffa system is used to measure:
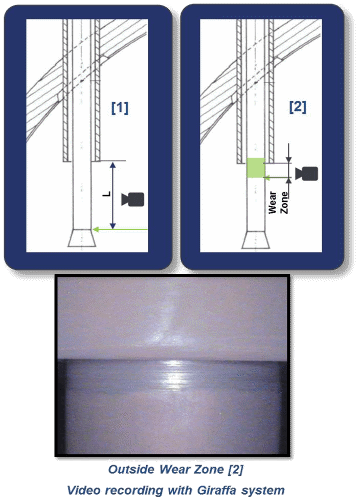
  • [1] The distance between the top of the thermal sleeve cone and the bottom of the RPVH adaptor (for comparison to the original as-built dimension),
  • [2] The wear height on the sleeve outer surface, at the adaptor penetration level (including video recording of the wear zone inspection).
Figure 2 - Inspections with Giraffa system

Figure 2 - Inspections with Giraffa system

Inside Inspection

The inside Serpentes system is used to visually survey:
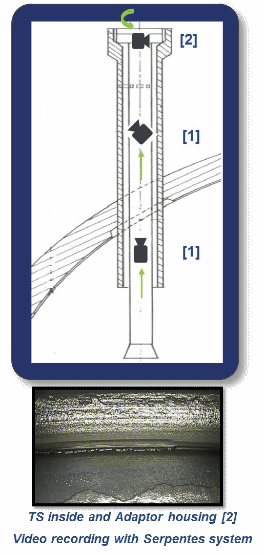
  • [1] The internal surface of the thermal sleeve, looking for debris/mechanical damage,
  • [2] The RPVH adaptor housing and Thermal Sleeve seated surface to record material loss and to measure their individual dimensions by laser scanning.
Figure 3 - Inspections with Serpentes system

Figure 3 - Inspections with Serpentes system